Almost everything written about fuel level sensors stops at the brochure. It tells you a capacitive probe is more accurate than the factory float gauge, shows a clean render of a tank, and leaves out the part where somebody is standing on a diesel tank in 45°C heat with a hole saw, wondering whether the probe is going to read anything at all when they climb back down.
This is that missing part. Below is a complete walkthrough of a real installation carried out on 7 August 2026 — an Omnicomm LLS capacitive probe fitted to a tractor unit operating in the UAE, wired to a Teltonika tracker, and brought live on the CargoSurge platform. Real photographs, the actual parameter values, and the specific failure modes that turn a correctly-fitted sensor into a useless one.
If you are evaluating fuel monitoring, this is what the work actually looks like. If you already run sensors and they read nonsense, the diagnostics near the end are probably where your problem is.
Why fit a probe at all when the truck already has a fuel gauge?
The factory gauge is a float on an arm feeding a dashboard needle. It exists to stop a driver running dry, and it is entirely adequate for that. It is useless for anything financial. It is damped so heavily that a slow drain is invisible, it is non-linear across the tank, it reports to the dashboard rather than to a system, and its resolution is roughly "you have some fuel".
A capacitive probe measures the dielectric between two concentric tubes. Diesel and air have very different dielectric constants, so the capacitance changes continuously with depth. What you get is a high-resolution, repeatable reading of how much fuel is actually in the tank, sampled every few seconds and delivered to a server — which is the difference between a gauge and an instrument.
That difference is what makes fuel theft detection possible at all. You cannot detect a 40-litre siphon overnight with a float gauge. You can see it clearly on a probe.
Step 1 — Measure the tank before you cut anything
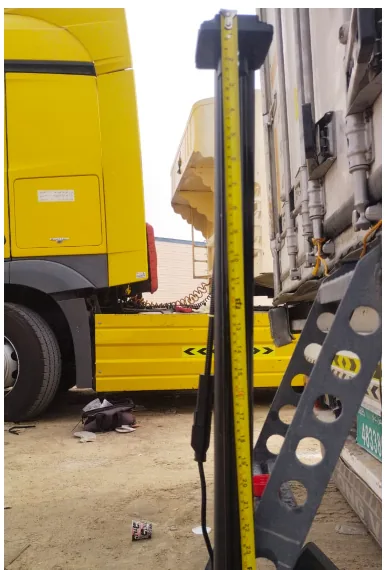
An LLS probe ships longer than any tank it will be fitted to, and is cut to length on site. Two measurements matter: the internal depth of the tank at the mounting point, and the clearance you intend to leave at the bottom.
The probe should stop a short distance above the tank floor — typically 10-20 mm. Sitting it flush on the bottom means it reads the sludge, water and debris that collect in every diesel tank, and risks mechanical damage as the tank flexes. Leaving too much clearance means the bottom of the tank is invisible to the sensor, and the truck appears to run out of fuel while it still has usable diesel.
Cut too short and you cannot undo it. This measurement is the one step of the job with no recovery.
Step 2 — Cutting the tank top
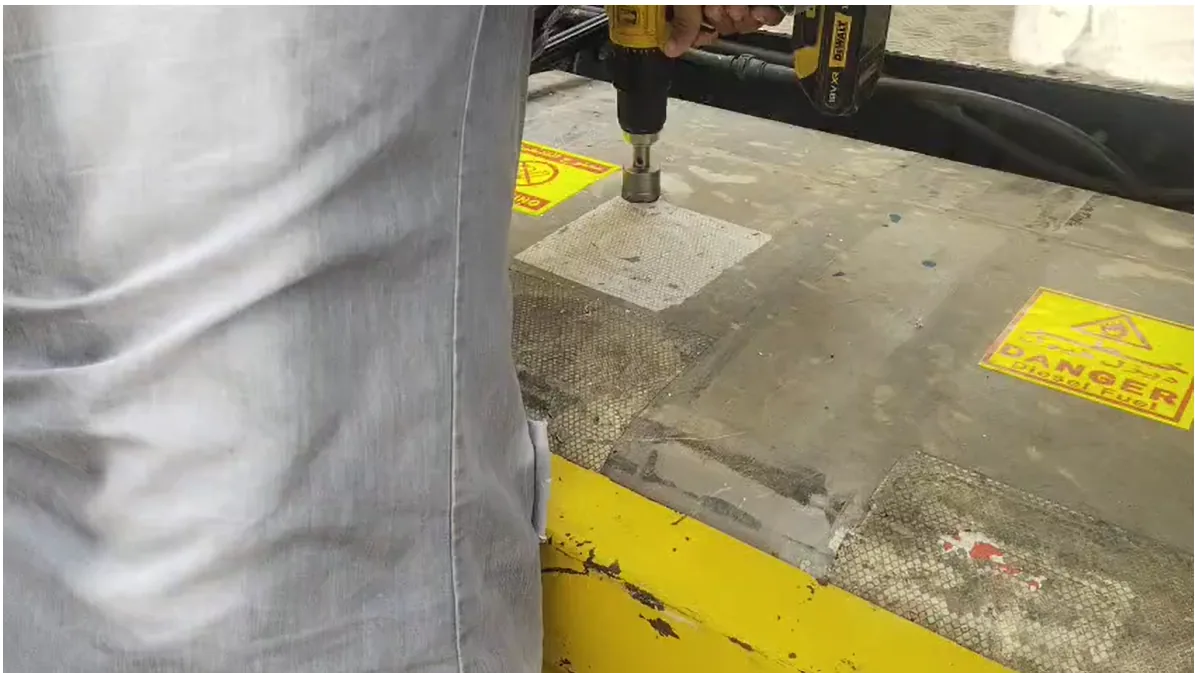
The probe mounts through the top of the tank on a standard bolt pattern. The hole is cut with a hole saw, and this is the point in the job that demands the most discipline.
You are cutting steel above a tank containing diesel and, more importantly, diesel vapour. The controls are not optional: the vehicle is isolated, the area is ventilated, no ignition sources are anywhere near the work, and swarf is captured rather than allowed to fall into the tank. The yellow hazard labels visible in the photograph are not decoration — they are why the crew treats a routine drilling job as a hot-work permit.
Metal filings that fall into the tank do not stay put. They migrate to the fuel filter and the injection system, and a fuel-sensor installation that ends in an injector overhaul has cost far more than it will ever save. Magnetic swarf capture and a slow, controlled cut are the whole technique.
Step 3 — The probe and its harness
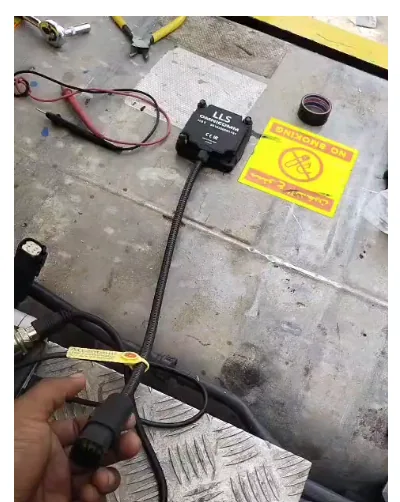
The probe carries four conductors: supply, ground, and the RS-485 differential pair (A and B). It is a digital sensor — it does not output a voltage or a resistance for someone else to interpret. It computes a level internally and reports it as a number over a serial link.
This matters commercially. An analogue sender can be spoofed with a potentiometer by anyone who wants their tank to look full. A digital probe on a polled bus is considerably harder to fake, and its absence is detectable — which, as we will see, is a property the platform depends on.
The harness is routed with the same care as any chassis wiring: away from heat, away from moving suspension components, secured at intervals, and with a drip loop so water runs away from the connector rather than into it.
Step 4 — Mounting and sealing
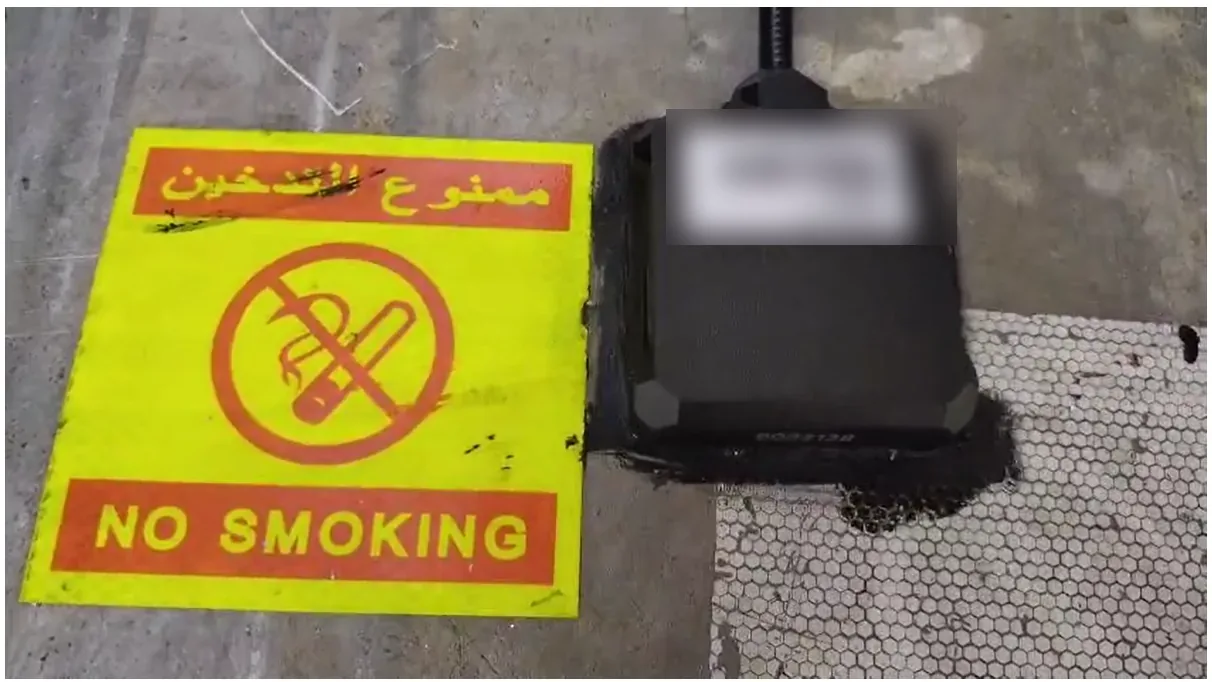
The probe seats on a gasket and is drawn down evenly onto the tank top. A leaking fuel-sensor flange is a diesel leak in the worst possible place, so the seal is checked before the vehicle moves.
The serial number on the probe is recorded against the vehicle at this point. It sounds like paperwork, and it is the thing that makes the sensor auditable two years later when somebody asks why a truck's readings changed. A sensor with no recorded identity is a sensor whose history cannot be reconstructed.
Step 5 — Wiring into the vehicle
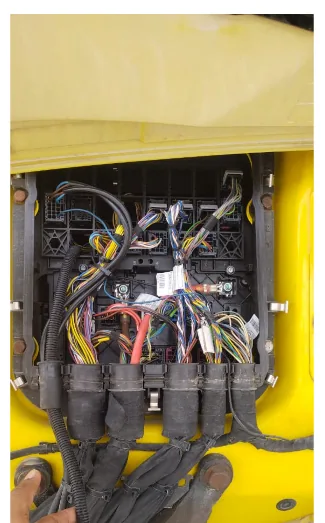
The probe terminates at the tracker. Two rules govern this part of the job, and violating either produces a sensor that works on the bench and fails on the road.
Take permanent power, not ignition-switched power. A sensor that dies with the ignition cannot report anything overnight — and overnight, on a parked truck, is precisely when fuel is stolen. A probe powered from an accessory circuit is a probe that is asleep during every event you bought it to catch.
Respect the RS-485 pair. A and B are a differential pair and must stay twisted. Splitting them, running them alongside a high-current circuit, or extending one leg through a different route reintroduces exactly the noise immunity the standard exists to provide. Most intermittent fuel sensors are wiring faults, not sensor faults.
Step 6 — Configuration, which is where most installations actually fail
The mechanical work is the visible half. The configuration is the half that decides whether litres ever appear on a screen, and it is where installations most often stall — the probe is correctly fitted, correctly wired, and reports nothing.
For an Omnicomm LLS on a Teltonika tracker, these are the values that matter:
- Baud rate 19200. The Omnicomm default. If the tracker's serial port is set to anything else, the probe is answering into silence.
- Slave mode with a network address. The probe answers polls rather than broadcasting. The address is set in the Omnicomm Configurator with "automatic data output" off. Master mode — where the probe pushes unasked — is valid only when there is exactly one probe on the line.
- The serial port set to LLS mode. On the unit in this installation the probe runs on RS-485, not RS-232. Getting this backwards is a common and confusing failure, because the wiring looks perfect.
- Fuel level reported on AVL element 201 (LLS 1 Fuel Level), with its reporting priority enabled. A tracker will happily read a probe and never transmit the value if the element is disabled.
One diagnostic is worth knowing because it inverts the usual assumption: the absence of a fuel reading does not tell you the sensor is disabled. On the vehicle in this installation, the reporting element was enabled and the value was still missing — which moved the fault to the probe and the serial link, and away from the configuration entirely. Only reading the device separated the two.
The sentinel that fakes a full tank
This is the single most valuable thing in this article, and it is almost never mentioned.
When an Omnicomm probe is polled and does not answer — unpowered, disconnected, faulty, wrong baud rate — the tracker does not report "no data". It reports 65532, an unsigned representation of −4. That is a sentinel meaning "no answer", and to any system that does not recognise it, it is simply a very large number.
Feed 65532 into a raw-to-litres calibration curve and it calibrates to a completely full tank. A probe that loses power overnight therefore produces, every single night, a phantom refuel at the moment it dies and a phantom drain at the moment it wakes — on a truck that never moved.
CargoSurge rejects the whole 0xFFFC–0xFFFF band before calibration is applied. Any fuel platform that does not is generating fictional events for every sensor that ever drops offline, and those events look exactly like theft.
Calibration: turning a raw number into litres
A commissioned probe reports a raw count, not litres. Converting one to the other requires knowing the shape of the tank, and tanks are not boxes. A horizontal cylinder, a D-section, or a stepped tank all have a cross-sectional area that varies with depth, which means the relationship between depth and volume is a curve, not a line.
A straight-line calibration on a cylindrical tank is wrong everywhere except the two points it was anchored on, and most wrong at the top and bottom — where the alerts are. CargoSurge derives the curve from tank geometry (shape and dimensions), then anchors it against real measured refuels, which is the same empirical method Omnicomm's own tooling uses.
The failure mode nobody warns you about: temperature
A tank probe reads its own temperature almost as much as it reads fuel.
Diesel expands with heat — roughly 0.083% per °C, which on a 110-litre tank is about 0.09 litres per °C. That much is well known, and most systems compensate for it.
What is far less well known is that the sensor's own drift is much larger. Measured on a probe in this fleet across a 32–75°C range, the drift was approximately 0.32 litres per °C — around 3.5 times the fuel's own expansion. Compensating only for the diesel leaves most of the error in place.
In the Gulf, where a tank top can swing 40°C between night and afternoon, that error traces a smooth arc across the day. The falling half of that arc looks exactly like a slow siphon. It is the single most common source of false theft alerts on GCC fleets, and it produces them on healthy trucks with correctly-installed sensors.
The correction has to be measured per sensor, not assumed. While a truck is parked with the ignition off, the volume in the tank physically cannot change — so any variation over that window is, by definition, the sensor's error. That gives a clean fit with no need to instrument anything. On the probe above, the fit came out at r = 0.99 over 260 samples.
What you get once it is running
A correctly installed and calibrated probe reporting into a platform gives you:
- Actual consumption per vehicle, from tank mass balance rather than from receipts — which is the only way to see fuel that was paid for and never delivered.
- Refuel events with real volumes, reconcilable against pump receipts and fuel cards.
- Drain detection in every state the truck can be in — parked, idling, or moving — because unexplained loss is measured against expected consumption for that state.
- Driver and location attribution on every event, which turns "we are losing diesel" into a specific, investigable finding.
None of that is available from a float gauge, and none of it is available from a probe that was fitted well and configured badly.
Practical notes for fleet operators
A few things worth knowing before you commission a programme of installations:
- Budget the downtime honestly. A first installation on an unfamiliar tank takes most of a day. Once the crew has the pattern, it is a few hours per truck.
- Do the trucks that matter first. Highest fuel spend, longest routes, and any vehicle already under suspicion. The business case proves itself fastest there.
- Expect the first fortnight to be noisy. The calibration curve is anchoring and the temperature coefficient is still being learned. Judge the system after it has settled, not during.
- Tell the drivers. A fuel monitoring programme announced as a cost-control measure gets cooperation. The same programme discovered by a driver gets tampering.
The honest summary
Fitting a fuel sensor is not difficult work, but it is unforgiving work. The probe must be cut to the right length, mounted without contaminating the tank, sealed properly, powered permanently, wired with the differential pair intact, configured to the right protocol and baud rate, calibrated against the real shape of the tank, and temperature-corrected against its own measured drift.
Miss any one of those and you get a number on a screen that looks entirely plausible and means nothing. That is the genuine risk with fuel monitoring — not that it fails visibly, but that it produces confident, wrong figures that somebody then acts on.
Get all of them right and you have the most valuable instrument on the truck.
CargoSurge supplies, installs and operates fuel monitoring for road fleets across the UAE, Saudi Arabia and the wider GCC — sensors, calibration, drain detection and the reconciliation that turns readings into recoverable money. Talk to us about your fleet.